Friday, February 25, 2011

Important In SEO Tips

SEO is changing on a regular basis. Some tricks within SEO are very effective for a time, then the search engines catch on and these tricks no longer work, or even worse – cause penalties to be levied upon your site. Here are 5 important SEO tips and tricks that can be used consistently that are approved by the search engines.

The Title Tag:
 This has always been the main point for SEO. If you do nothing else, make sure to keep your keywords within the title tag. This shows the search engines what your page is focused on. It’s recommended that you keep the title tag unique – do not use the same title tag for multiple pages. That way only one page will be focused on for that particular keyword phrase. Also – do not spam your keywords in your title tag. Keep it readable so people browsing will want to click it, and keeping it under the readable limit (69 characters for Google) is also good to aim for.

The Description Tag:
 This fits with the title tag, and it helps to put your keywords into it. But even more than the title tag, this needs to be very readable. This is the element in SEO that is more for your visitors than it is for the search engines. If your description tag is unreadable, no one will be interested and you won’t get clicks, even if you’re at the top of the listings. Also, like the title tag, keep this one unique for the page it’s on and within the limit (156 characters for Google).

The H1 Tag:
 The H1 tag is your primary header tag. This should fit with the same keywords you’re using for your title tag, but doesn’t need to match it exactly. If anything, focus the exact phrase in your title tag, and something similar in the H1 tag. And don’t cram an H1 tag into your page just because you want SEO – make it fit the design of your page. You can always change the size of your H1 tags inside a CSS file, so it doesn’t have to be huge text.

Anchor Text for Links to Your Page:
 Anchor text is also known as “link text”. This is the text that is clicked to get to your page. By being very careful about what keywords you place in the anchor text you can help raise your rankings for the pages you want to boost in the listings. This can be from other sites or it can even be from links on your own site. The more links with a particular anchor text that point to a page on the web, the higher it rises in the listings. This is crucial for SEO.

Precaution With Links From Your Page:
 Links to your page are what helps boost your position on the search engine result pages. Links from your page can help other sites but can potentially hurt your listing positions. Make sure the links you have pointing out from your pages are not broken links, and definitely make sure they are not pointing to naughty pages that contain malware or are a source of viruses. Doing that is a sure way to get your site either penalized or even blacklisted from the search engine results.
If you take care with these 5 important SEO tips and tricks it should help jump your page position on the search engine results pages. It’ll take work, but with continued effort you can have an optimal outcome!

Search Engine Optimization Basic Tips

I write this note for those who want to know basic about Search engine optimization and want his site get indexed and listed in the major search engines. Here i discuss the most importance areas to get any website properly indexed by the search engines. The areas that we need to going through are the

1.Title Tag
2.Meta (Description and Keywords) Tags 
3.Body text: a brief description of what you should write in the body text of your main (index) page.

This is just a very brief description, but it will nonetheless be very useful to the novice web designer to get a better understanding of the basics on how to get your website indexed and listed at the major search engines.
Below you can see  HTML code of a basic website. After This code I will give a brief description of each code tag you see.

<HTML>
<HEAD>
<title>Enter your Title here</title>
<meta name="keywords" content="Enter your key words here">
<meta name="description" content="Enter your description here">
</HEAD>
<BODY>
Enter your page's body text here
</BODY>
</HTML>

<title> Tag :
The first thing you need to do is identify the keyword phrases that are relevant to your company, products and services. When you have decided on your "keyword phrases" you need to put them in your page's <title> tag. 
The title tag is definitely the most important tag in the header section of your web page. The title tag is displayed in the blue bar at the top of your browser window (SEO - Basic search engine tips - How to get indexed and listed at search engines). The title tag is a one-liner describing your business, and it includes the most important keywords. The search engines place a lot of relevance on the words contained 
within the title tag, so be sure to include your targeted keyword phrases.
The title tag should not exceed 60 characters.

<META> Tags :
META tags are basically composed of the
description 
<meta name="description" content="Enter your description here">
 and keyword 
<meta name="keywords" content="Enter your key words here"> tags.

Description:
The description tag is used to describe your web page / business. Some search engines will use this 
information to summarize your website in their search listings. It's again of utmost importance that you also include your keyword phrases in the description tag.

* The description tag should provide a 25-30 word description of your website.
Keywords:
 The keyword tag should of course include the "keyword phrases" that you are targeting in order of 
importance. Start with the most important and then proceed to less important but still relevant keywords. 
Do not include keywords that are not relevant to the theme of your site.
*  Do not repeat any word more than 3 times within the keyword tag.

<Body> Tag :
In the body tag section of your website, you should describe and explain the nature of your business, products, scope of the website, etc. You should generally include around 500-600 words in this area. Make 
sure to repeat your "keyword phrases" a few times so that search engines will consider these to be very 
important and relevant to your website. For nearly all search engines content is still king, and having lots of quality content will help you to increase your ranking with the major search engines.
After completing your site you have one last job to do. That is :
* Submission to Search engines
* and Submission to Directories.

SUBMITTING TO THE SEARCH ENGINES :
Once your web page is fully optimized, it is time to submit it to the major search engines. Although there are hundreds of search engines on the Internet such as Google, MSN, Yahoo, USFreeAds, OPN, BusinessSeek, Searchwarp, Searchsight, National Directory, Quango, Homerweb, HiddenStreet, killerInfo, SearchIt, AdlandPro and many more., only a handful are truly important.

I know there must be a question arise in evry novice person how can i and where can I add my site url ? 
Don’t worry Here I give you top three search engines add url link.
Google (Add URL)
Yahoo! (Add URL)
BING(msn of old) (Add URL) 

It's recommended that you submit your website to the search engines manually instead of using any automated submission tool, because some search engines regard those as spam, and won't list your site. Keep in mind that it can take months before you get listed, so be patient.

SUBMITTING TO DIRECTORIES :
Search engines need a starting point. That's why human edited directories are important to be listed in. 

There are couple of major web directories at this moment:
       DMOZ - Free listings.
       The Yahoo directory  - Free listings for non-commercial sites. 

How to do Keyword Research ?

Keyword research is one of the vitally important aspect of your search engine optimization campaign. If you target wrong keyword, the search engines and your customers may never find you and also you don’t get a good rank Without good rank you cannot do good business by your website. To do that you need to spend much time to select keyword. Here i try to give you some advice and usefull keyword research tools link. Hope this will help you.
The initial idea of keyword research can be daunting. Trying to come up with the perfect combination of words to drive customers to your site, rev up your conversion rate and allow the engines to see you as an expert would easily give anyone a tension headache.

The trick is to start slowly.

The first step in this process is to create a list of potential keywords. Brainstorm all the words you think a customer would type into their search box when trying to find you. This includes thinking of phrases that are broad and targeted, buying and research-oriented, and single and multi-word. What is your site hoping to do or promote? Come up with enough words to cover all the services your site offers. Avoid overly generic terms like 'shoes' or 'clothes'. These words are incredibly difficult to rank for and won't drive qualified traffic to your site. Focus on words that are relevant, but not overly used.

If you need help brainstorming ideas, ask friends, colleagues or past customers for help. Sometimes they are able to see your site differently than the way you yourself see it. Also, don't be afraid to take a peek at your competitor's Meta Keyword tag. What words are they targeting? How can you expand on their keyword list to make yours better? It's okay to get a little sneaky here. All's fair in love and search engine rankings.

After selecting keywords your next step is to determine the activity for each of your proposed keywords. You want to narrow your list to only include highly attainable, sought-after phrases that will bring the most qualified traffic to your site.

In the early days of SEO, measuring the "popularity" of your search terms was done by performing a search for that phrase in one of the various engines and seeing how many results it turned up. As you can imagine, this was a tedious and ineffective method of keyword research. Luckily, times have changes and we now have tools to do the hard part for us.
By inputting your proposed keywords into a keyword research tool, you can quickly learn how many users are conducting searches for that term every day, how many of those searches actually converted, and other important analytical information. It may also tune you in to words you had previously forgotten or synonyms you weren't aware of.
There are lots of great tools out there to help you determine how much activity your keywords are receiving. Here's a few of my personal favorites:

Google AdWords Keyword Tool : Google's keyword PPC tool doesn't provide actual search numbers for keywords. Instead, it displays a colored bar, giving users only an approximation. Still, it may be useful.

Check Traffic tool : This tool will produce an estimate of daily search activity for a specific keyword phrase on the internet across the major search engines. This is only an estimate, and on a daily basis your mileage may vary.

Wordtracker :  Wordtracker's leading-edge research tool gives you the keywords you need to rise above your competitors in search engine rankings. Even better, we also show you how keyword research can help you discover untapped market niches, get inspiration for new products, & create compelling content that distinguishes your site from the pack.

Trellian Keyword Discovery tool :  Keyword Discovery compiles keyword search statistics from all the major search engines world wide, to create the most powerful Keyword Research tool.

http://www.keywordspy.com :  FREE SEO & PPC Keyword Research software tool, that unveil your competitors’ most profitable Ad copies & keywords. Learn from time-tested Ad campaigns.


Apogee-web-consulting :  FREE  KEYWORD  RESEARCH TOOL
After tested your keywords it's time to narrow down the field and decide which terms will make it into your coveted final keyword list.

I recommend creating a spreadsheet or some other visual that will allow you to easily see each word's conversion rate, search volume and competition rate (as given to you by the tools mentioned above). These three figures will allow you to calculate how viable that term is for your site and will be a great aid as you try and narrow down your focus.

The first step in narrowing down your list is to go through and highlight the terms that most closely target the subject and theme of your web site. These are the terms you want to hold on to. Kill all words that are not relevant to your site or that you don't have sufficient content to support (unless you're willing to write some). You can't optimize for words that you don't have content for.

Create a mix of both broad and targeted keywords. You'll need both to rank well. Broad terms are important because they describe what your web site does; however, they won't increase the level of qualified traffic coming into your site.

After made up your highly focused keywords, now what do you do with them? You prepare them for launch! Chances are, if you did your keyword research right, at least some of the words on your list already appear in your site content, but some of them may not. Start thinking about how many pages you'll need to create to support these new words, and how and where your keyword phrases will be used. I typically recommend only going after three or four related keywords per page (five if you can balance them properly). Any more than that and you run the risk of diluting your page to the point where you rank for nothing. Make sure to naturally work the keywords into your content and avoid over-repetition that may be interpreted as spamming. Your content should never sound forced.

Your on-page content isn't the only place where you can insert keywords. Keywords should also be used in several other elements on your site:
•    Title Tag 
•    Meta Description Tags 
•    Meta Keywords Tag 
•    Headings 
•    Alt text 
•    Anchor Text/ Navigational Links

You've spent a lot of time molding your keywords; make sure you use them in all the appropriate fields to get the maximum benefit.
Congratulations. Your initial keyword research process is behind you. You've created your list, checked it twice, made friends with the keyword research tools and are now off to go plan your attack. You're done, right?

Tuesday, February 22, 2011

WHAT IS IMAGE SIZE AND RESOLUTION ?

Once you scan an image or take a picture with your digital camera, it becomes digitized—made up of hundreds of thousands of pixels. Pixels are nothing more than very tiny colored squares (there are 72 pixels in an inch) that you can see if you increase the magnification of any image to its maximum:

Resolution is the number of pixels in a linear inch—pixels per inch (or PPI), but it is most commonly referred to as dots per inch (DPI). The more pixels, or “dots,” per inch, the higher your image resolution will be.

With color images, each pixel can be one of 16 million different colors. For black and white images, there are 256 gradations of gray pixels ranging from black to white: 0 (black) through 255 (white). More pixels means higher resolution, which creates better image quality because you end up with more realistic representations of color, better gradations of both individual colors and gray tones, and crisper images in general.

The most important thing to understand about resolution is the relationship between an image’s resolution (DPI) and an image’s print size (the actual width and height).

Open an image. Go to the Image Menu and select Image Size. This is where you can change an image’s resolution and print size (width and height). The following Image Size dialog box will appear:


Note that the width and the height of the image as you view it on your monitor is not necessarily representative of the image’s actual width and height—i.e., the size it would print out at (print size). Average monitor resolution is 72 dpi. If you view a 72 dpi image at 100% in Photoshop, chances are that it will appear on your screen in its actual print size. However, this is not true when viewing a 300 dpi image. A 300 dpi image viewed on-screen at 100% will be enormous. Don’t get tricked into believing that what you see on your monitor is what you'll get when you print or place the image into another application. The best way to determine what your image’s actual print size will be is through the Image Size dialog box.

                                                  Monitor Display and Image Size
In the "olden" days, a typical 13-inch monitor would display at 640 by 480 pixels. As such, if you set a larger monitor to this resolution, the same image viewed on the smaller screen would appear bigger on this larger screen. The key here is to understand that the image only displays larger. It is, in fact, the same pixel size on both screens. If you changed the pixel size of this larger monitor to about 1152 by 870, the image would appear at roughly the same size as it does on the smaller 640 by 480 pixel screen.

When the Resample Image box is checked, any changes you make to an image’s width or height will not change the image’s resolution, and as such, any changes you make to an image’s resolution will not affect the image’s width and height. Keep in mind, however, when you increase width and height, or resolution, with the Resample Image box checked, you are adding pixels to your image. These pixels don’t actually exist so Photoshop must create them. As such, you will succeed only in degrading the quality of your image.

If you want to increase an image’s width and height, or resolution, then uncheck the Resample Image box. Now any changes you make to the image’s width and height will change the image’s resolution, and vice versa:

    * If you decrease resolution, the width and height will increase.
    * If you increase resolution, the width and height will decrease.
    * If you increase the width or height, the resolution will decrease.
    * If you decrease the width or height, the resolution will increase.

The best way to increase the width and height of a scanned image is to scan the image in at a high resolution (about twice what your final resolution should be), and with the Resample Image box unchecked, decrease the resolution. Once the image width and height is where you want it, you can then check the Resample Image box and type in the resolution you want if the resolution is too high. At this point, as long as you don’t increase resolution, or width and height, your image quality will not suffer.

IMAGE FORMATS GIF vs. JPEG

The best rule of thumb is to use the GIF file format for Web graphics that are composed of few colors and contain large areas of uniform color (such as logos, cartoons, simple art work, line art, graphs, and charts). Use the JPEG file format for Web graphics that are composed of textures and gradations of many colors (such as three dimensional objects and scanned photographs).

Why? Because the GIF graphic file format only supports 256 colors whereas JPEG supports millions, but more importantly, JPEG supports millions of color gradations. A blue sky, for example, is composed of millions of gradations of the color blue. Each gradation counts as one color. If your scanned photograph of this blue sky contains more than 256 shades of blue, some of these shades of blue will have to be eliminated when you convert the graphic to GIF format. Reducing colors in this fashion causes unsightly banding.

In addition, you can greatly reduce the file size of some Web graphics by using the JPEG format. In the example below, the left graphic was saved in GIF format and the file size when loaded up to my server is 25 kilobytes. The graphic on the right was saved in JPEG format with about 40% compression and it's only 4 kilobytes:
   
The downside, however, with using the JPEG format is that JPEGs cannot be interlaced or transparent. Also, if your Web graphic has a large area of solid color, the JPEG format may create an unsightly dither pattern. Dithering appears as a pattern of tiny dots. If your monitor is capable of displaying thousands or millions of colors, you can see evidence of dithering in the sky right around the houses in the JPEGs above, especially in the 4 kilobyte JPEG. (If your monitor can only display 256 colors, both photos will look fairly crappy anyway.) 

Sunday, February 20, 2011

How To Create Twinkling Stars Using Graphic Symbols !

If you would like to follow along using our night sky background you can download it by right -clicking on the image and saving it to your hard-drive.

Step 1: Start Flash and Create a New Flash Document :
Start Flash and create a new document (File > New and choose Flash Document or Ctrl (win) / Cmd(mac) + N and choose Flash Document) and to make it easier to follow along reset Flash's workspace to default. Choose Window > Workspace Layout > Default.


Step 2: Set the Document Properties :
Double-click the Frame Rate label at the bottom of the Timeline to display the Document Properties dialog box.
If you are using the Night Sky Jpeg, change the dimensions to 480 width and 320 height otherwise size the document to match the graphic you are using as a background. We don't need to specify the background color as we are going to completely cover the background layer with the night sky jpeg. Leave everything else at their default values and Click OK .


Step 3: Import the Night Sky JPEG :
Import the night sky jpeg to the stage by choosing File > Import > Import to Stage.


Step 4: Position the Night Sky JPEG :
Now that we have our Night Sky JPEG imported into our new document we need to accurately position it on the stage so that it doesn't leave any hairline cracks around the edges. The easiest way to accomplish this is to use the Align Palette.
Open the Align Palette by choosing Window > Align or Ctrl (win) / Cmd (mac) + K
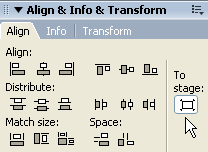
With the Align Palette you can choose to Align various objects relative to each other or you can Align objects to the Stage itself by clicking the Align to Stage button. Select the Night Sky JPEG and with the Align to Stage button on click on the Align Horizontal Center button and then the Align Vertical Center buttons to move the Night Sky JPEG into position. 


Step 5: Lock Layer 1:

Now that we have accurately aligned our background graphic we want to prevent the possibility of accidently moving it. On the Layers Palette click in lock column within layer 1 to prevent further editing of this layer.


Step 6: Create a New Layer :
Click on the Insert Layer icon at the bottom of the Layers Palette to create a new layer.

Select the Polystar tool from the tool box (if it is hidden click on the Rectangle Tool and hold down the mouse till the Polystar tool displays). With the Polystar tool selected you can then set the properties of the tool in the Properties Inspector at the bottom of the screen.
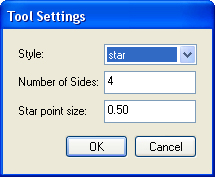
Set the fill to white and the stroke to none. Then click on the Options button on the Properties inspector to open the Tool Options dialog box. This is where we will choose the Star shape, 4 points and a point size of 0.50. Then click OK.
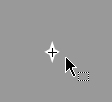
Now that the tool is set draw out a small star shape. If you are happy with this shape you can leave like it is. To me stars always seemed a bit more diamond shaped so I am going to push in the horizontal arms using the selection tool.
When altering small objects it is best to get a close up view. Use the zoom tool and draw a marquee around the star to get a better view of the object you are working on. Then choose the Selection tool but do not select the star object. Just nudge one of the horizontal arms towards the center.


Step 8 Convert to Symbol :
Now that we have the star in the shape we want we want, we need to convert it to a symbol. Select the shape and choose Modify > Convert to Symbol or F8. Choose Graphic for the type of symbol and make sure the registration is set to center. Then click OK.

Step 9: Creating the Twinkling Star symbol :
We are now going to create another symbol that will actually contain instances of the first symbol. Start by choosing Insert > New Symbol. Name this symbol twinkleStar and choose Graphic for the Type, then click OK.
This will take you into symbol editing mode. The problem is that we are going to be working with a white star on a white background. To make it easier to see double click the Frame Rate label in the timeline (see step 2) and change the background color to something other than white. We need to access our already created starShape symbol so if the Library isn't already displaying along the right side of the screen choose Window > Library to open it.
Your library should look much the same as the picture at the right.

Drag one of your StarShape symbols from the Library onto the Stage. Use the Align palette and center the star symbol on the stage by clicking on the Align to Stage button and choosing Align Horizontal Center and Align Vertical Center.
This forms the first frame of our twinkling Animation.
We are going to create the other stages of our twinklingStar symbol by right-clicking(win) or Cmd-clicking (mac) on the single keyframe in the timeline and choosing Copy Frames from the resulting context sensitive menu. Then right-click in the empty 10th frame and choose Paste Frames. Repeat for the 20th Frame.


We now have three key frames in our symbol but... they are all the same. In order to create the twinkling effect we are going to set the opacity of the symbol instance in the first and 20th frames to 0.
First, select Frame 1 in the timeline. Then select the starShape Symbol on the stage and choose Alpha from the Color drop down box on the Properties Inspector. Set the Alpha to 0. Repeat this with the Star Symbol on the 20th frame.

At this point your symbol's timeline contains three keyframes. We now need to add a couple of motion tweens to blend the changes between the 1st, 10th and 20th frames. Insert a motion tween by right-clicking(win) or Cmd-clicking (mac)on the grey bar between the 1st and 10th frame and choose Create Motion Tween from the resulting context menu. Create a second motion tween between the 10th and 20th frames.
The twinkling Star symbol is done - now we just have to add a bunch of instances to the background to create our own starry night.

To return to the main Timeline click on the Scene 1 link at the top of the Timeline.


Step 10: Adding Frames to the Main Timeline:
Because graphic symbols animate within the timeline of the movie they are inserted into we need to add some more frames to our movie or the stars animation won't display. If they were movie symbols having only 1 frame in the main timeline wouldn't matter however, we wouldn't be able to set the symbols to start on different frames.
On the main 40th frame in the main Timeline, right click (win) or Ctrl-click (mac) and choose Insert Frame. You will need to add frames to layer 1 as well or your background will disapear after the first frame.


Step 11: Adding twinklingStar Symbol Instances to our Movie :
Now all we need to do is add a whole bunch of twinklingStar Symbols to our movie. But... in order for this too look somewhat realistic we need to vary the stars sizes and when they pulse. The ability to change which frame the symbol animation starts on is the big reason we chose to use graphic symbols instead of movie symbols.
Click and drag a twinklingStar symbol from the Library onto the Stage. With the symbol selected set the following properties in the Properties Inspector. Width & Height, keep the lock symbol between the sizes to keep the object proportional. For my flash movie I chose to make all the stars between 2 and 6 wide. I know this sounds small but if the stars are too large they look fake. Then make sure Loop is chosen and give the star symbols you add a variety of first frames. Remember you have 20 frames to choose from. If you leave them all set to 1 they will all pulse at exactly the same time so give them some variety.
Now repeat for as many stars as you want to add. I find it more realistic if you group clumps of stars together with a few random one scattered about.


Step 12: Save and test your movie :
Choose File > Save as to save your movie to your hard-drive. Then choose Control > Test Movie to see how your twinkling star animation looks.

Thursday, February 17, 2011

what is robots.txt ? and how to Create robots.txt" file !

Introduction to "robots.txt" :
There is a hidden, relentless force that permeates the web and its billions of web pages and files, unbeknownst to the majority of us sentient beings. I'm talking about search engine crawlers and robots here. Every day hundreds of them go out and scour the web, whether it's Google trying to index the entire web, or a spam bot collecting any email address it could find for less than honorable intentions. As site owners, what little control we have over what robots are allowed to do when they visit our sites exist in a magical little file called "robots.txt."

"Robots.txt" is a regular text file that through its name, has special meaning to the majority of "honorable" robots on the web. By defining a few rules in this text file, you can instruct robots to not crawl and index certain files, directories within your site, or at all. For example, you may not want Google to crawl the /images directory of your site, as it's both meaningless to you and a waste of your site's bandwidth. "Robots.txt" lets you tell Google just that.
Creating your "robots.txt" file :
So lets get moving. Create a regular text file called "robots.txt", and make sure it's named exactly that. This file must be uploaded to the root accessible directory of your site, not a subdirectory (ie: http://www.mysite.com but NOT http://www.mysite.com/stuff/). It is only by following the above two rules will search engines interpret the instructions contained in the file. Deviate from this, and "robots.txt" becomes nothing more than a regular text file, like Cinderella after midnight.
Now that you know what to name your text file and where to upload it, you need to learn what to actually put in it to send commands off to search engines that follow this protocol (formally the "Robots Exclusion Protocol"). The format is simple enough for most intents and purposes: a USERAGENT line to identify the crawler in question followed by one or more DISALLOW: lines to disallow it from crawling certain parts of your site.

1) Here's a basic "robots.txt":
User-agent: *
Disallow: /
With the above declared, all robots (indicated by "*") are instructed to not index any of your pages (indicated by "/"). Most likely not what you want, but you get the idea.

2) Lets get a little more discriminatory now. While every webmaster loves Google, you may not want Google's Image bot crawling your site's images and making them searchable online, if just to save bandwidth. The below declaration will do the trick:
User-agent: Googlebot-Image
Disallow: /

3) The following disallows all search engines and robots from crawling select directories and pages:
User-agent: *
Disallow: /cgi-bin/
Disallow: /privatedir/
Disallow: /tutorials/blank.htm

4) You can conditionally target multiple robots in "robots.txt." Take a look at the below:
User-agent: *
Disallow: /
User-agent: Googlebot
Disallow: /cgi-bin/
Disallow: /privatedir/
This is interesting- here we declare that crawlers in general should not crawl any parts of our site, EXCEPT for Google, which is allowed to crawl the entire site apart from /cgi-bin/ and /privatedir/. So the rules of specificity apply, not inheritance.

5) There is a way to use Disallow: to essentially turn it into "Allow all", and that is by not entering a value after the semicolon(:):
                                      User-agent: *
                                      Disallow: /
                                      User-agent: ia_archiver
                                      Disallow:
Here I'm saying all crawlers should be prohibited from crawling our site, except for Alexa, which is allowed.

6) Finally, some crawlers now support an additional field called "Allow:", most notably, Google. As its name implies, "Allow:" lets you explicitly dictate what files/folders can be crawled. However, this field is currently not part of the "robots.txt" protocol, so my recommendation is to use it only if absolutely needed, as it might confuse some less intelligent crawlers.

Per Google's FAQs for webmasters, the below is the preferred way to disallow all crawlers from your site EXCEPT Google:
                               User-agent: *
                               Disallow: /
                               User-agent: Googlebot
                               Allow: /

What Is ASP.NET

This article will explain what the fuss is all about. ASP.NET is not just the next version of ASP; it is the next era of web development. ASP.NET allows you to use a full featured programming language such as C# (pronounced C-Sharp) or VB.NET to build web applications easily.You've probably heard the word ASP.net fairly often these days, especially on developer sites and news.

ASP.NET still renders HTML :

Unfortunately, the Internet still has bandwidth limitations and not every person is running the same web browser. These issues make it necessary to stick with HTML as our mark-up language of choice. This means that web pages won't look quite as amazing as a fully fledged application running under Windows, but with a bit of skill and creative flair, you can make some rather amazing web applications with ASP.NET. ASP.NET processes all code on the server (in a similar way to a normal application). When the ASP.NET code has been processed, the server returns the resultant HTML to the client. If the client supports JavaScript, then the server will use it to make the clients browser experience quicker and easier. Even with HTML being the limiting factor here, ASP.NET still manages to bring true OOP (Object Oriented Programming) to the Internet.

OOP on the Internet :

Object Oriented Programming makes it possible to build extremely large applications, while still keeping your code clean and structured. Now with ASP.NET, we can do the same on the web. Traditional ASP uses HTML and VBScript (or Jscript) to process and render pages, but because VBScript is a scripting language, you were forced to write spaghetti code (VBScript was entwined in the HTML and ended up rather messy in larger applications). ASP.NET separates code from display, and you can even have pages with no ASP.NET code in them at all. By adding references in your HTML (called controls), you can tell ASP.NET that you want a button here, some text there, and then in your code, you can manipulate what these controls look like, what they display, how big they are, etc. Controls can do more than just display information. You can add events to controls, so that when a visitor clicks on a button, for example, ASP.NET executes a function of your choice.

Great XML Support :

ASP.NET makes it simple to use XML for data storage, configuration and manipulation. The tools which are built into ASP.NET for working with XML are very easy to use. XML is excellent for storing information that rarely changes, because you can just cache that information in the computers memory after it has been initially extracted.

Web Services :

One great feature of ASP.NET is Web Services. Web services mean that you can literally have several pieces of your application on different servers all around the world, and the entire application will work perfectly and seamlessly. Web services can even work with normal .NET Windows applications. For example: A lot of people would like to have a stock ticker on their web site, but not many people want to manually type in all changes to the prices. If one company (a stock broker) creates a web service and updates the stock prices periodically, then all of those people wanting the prices can use this web service to log in, run a function which grabs the current price for a chosen company, and return it. Web services can be used for so many things: news, currency exchange, login verification.. the ways in which they can be used are limited to your imagination!

Complete Compatibility :

One of the most important goals of .NET was to allow developers to write an ASP.NET application using multiple programming languages. As long as each ASP.NET page contains only one programming language, you can mix and match different pages using different languages and they will work together seamlessly. This means you can now have a team of developers with half programming in C#, and the other half in VB.NET, with no need to worry about language incompatibilities, etc.

Class Library :

ASP.NET includes an enormous class library which was built by Microsoft. Because this class library is so large, it encapsulates a a huge number of common functions. For example, if you wanted to retrieve data from a database and display that data in a simple grid control through classic ASP, then you'd have to write quite a lot of code.
In ASP.NET, you don't write any code to display the data: you just write the code to bind the data to an object called a DataGrid (which can be done in just a couple of lines). Then, you just have to create a reference on your page to where that DataGrid should go. The DataGrid will be rendered as a table, and will contain all of the data extracted from the database.
Microsoft has created an amazingly well designed MSDN library for ASP.NET and all of the other .NET languages. It includes a full class library containing information and examples on every class, function, method, and property accessible through ASP.NET.
The MSDN library also includes some tutorials and examples to get you started. It may take you a while to get used to the format and layout of the MSDN ASP.NET library, however, once you do, you will find it's an invaluable resource to aid you throughout your ASP.NET learning experience. The .NET MSDN library can be found at http://msdn.microsoft.com/net/


A cool little side-affect of all this is that all the programming languages look very similar, and differ only by their language syntax.
Take the following code snippets for example. They both do exactly the same thing but the first is written in C#, and the second in VB.NET.
                   The C# version:
                 void Page_Load(Object S, EventArgs E) { myLabel.Text = "Hello world!!";
                 </script>
                 The VB.NET version:
               Sub Page_Load(S As Object, E As EventArgs) myLabel.Text = "Hello world!!"
                End Sub
              </script>
If you take either of the code examples shown above and add the following HTML to them, then they would both run perfectly inside of an ASP.NET page:
                                             <head>
                                             <title>"Hello World" example!</title>
                                             </head>
                                             <body>
                                             <asp:Label id="myLabel" runat="server" />
                                              </body>
                                              </html>

How to Data Caching in ASP.NET

 If you use static data with your ASP.NET applications, such as that from a database server like Microsoft SQL Server, you should take a look at caching your data. Previously, this was not an easy thing to do, but the caching in .NET makes caching your data and objects a trivial task. This
tutorial will cover basic caching and scenarios where caching would be good to use.
In ASP.NET, every page you write extends the System.Web.UI.Page class, which contains a member called Cache. You use the Cache property as you would any other I Enumerable, which gives you methods and properties to get, set, and enumerate through members. We will be looking at getting and setting items in the cache. In the simplest example, you can
retrieve any object from the cache like so:
                                     Object obj = (Object)Cache["key"];

What this does is look in the Cache for an item with the key "key".
If such an item exists, the object is returned. While we don't need to cast the
returned object to Object, this is just an example of how you must cast the
return to the class type you want returned. If the item is not found, null is
returned, so you will need to do some checking:

                       Object obj = (Object)Cache["key"];
                           if (obj == null) {
                        // Generate a new object and insert it into the cache
                              }
                        // Use your object

You can also assign object to the cache like the following code example, but
using Cache.Inset() is a much better means as you'll see later:
                                       Cache["key"] = obj;


Caching in action- an example :

Now let's look at a serious example. In the example below, we will define a
function that binds data to a control, such as a ASP.NET DataGrid control. We
will look at data binding in a little more depth later. For this example, we
will use a System.Data.DataSet object.

                                         <%@ Page Language="C#" %>
                                         <%@ Import Namespace="System.Data" %>


            <script runat="server">
                private string _filename = "mydata.xml";
                    private void Page_Load(Object src, EventArgs args) {
                     DataSet ds = (DataSet)Cache["mydata"];
                      if (ds == null) {
                      ds.ReadXml(Server.MapPath(_filename));
                      Cache.Insert("mydata", ds,
                        new CacheDependency(Server.MapPath(_filename)),
                        DateTime.Now.AddHours(12), NoSlidingExpiration);
                         }


                         myDataGrid.DataSource = ds;
                           myDataGrid.DataBind();
                                 }

We'll break down the above example. The first part we've already discussed,
where we get the object from the cache. If the object is null (i.e., doesn't
exist in the cache), we need to create the object. The first line after
checking if our DataSet object is null loads an XML file called a DiffGram,
which is a serialized DataSet object. We'll talk about this later. Essentially,
the DataSet object (hereforth, "ds") is created from serialized
XML, which you can event type by hand. We call Server.MapPath() because the file
as we know it is virtual. ds.ReadXml needs the absolute path and filename to
load it. Server.MapPath() figures out what the absolute path of a virtual
filename (such as your web pages) and returns the absolute path.
The next statement inserts the newly created "ds" into the cache.
Again, the statement is:

                        Cache.Insert("mydata", ds,
                        new CacheDependency(Server.MapPath(_filename)),
                          DateTime.Now.AddHours(12), NoSlidingExpiration);

1:The first parameter is the key used to identify our cache item.


2:The second parameter is the object we want to cache. In this example, we
are caching the DataSet object "ds". This can be any object,
however, including strings, numbers, controls, etc.


3:The third parameter creates a dependency on an object. If this object
changes, the cached object is marked as expired and your application will
regenerate next time, returning null as your object reference. In fact, the
object is expired. You can also pass null in this parameter to signify that
you don't want any dependencies.


4:The fourth parameter is the absolute expiration period your object is
valid. Here, we use DateTime.Now (which uses "now's" time) and add
12 hours to it. This means the object will automatically expire in 12 hours.
You could also use NoAbsoluteExpiration which means the object will never
expire until the dependent object changes. We use an absolute expiration
here to make sure we have somewhat recent data in case the CacheDependency
doesn't expire the data for some reason. (As if Microsoft software doesn't
have bugs!)


5:The fifth and final parameter is a sliding expiration. This means that if
the object is access, the absolute expiration time is essentially pushed
back to however many minutes, hours, etc. you specify here. This is an
object of type TimeSpan. Here, we want our object expired after 12 hours
even if the object is accessed before then.


Binding our object to a data-driven control :
After all this, we can finally bind our object to a data-driven control, such as
the ASP.NET DataGrid control. While the full use of the control is out of the
scope of this tutorial, I will cover the usage in brief detail.
The DataGrid control is a data-driven control, meaning that on the server, the
control will use data and will then render the HTML onto the page for the client
to see in their browser. We will define a basic DataGrid control customizing
only a few parameters:


                             <body>
                             <asp:DataGrid id="myDataGrid" runat="server"
                           AutoGenerateColumns="true"
                           ShowHeader="true"
                           AllowPaging="true"
                           PageSize="25"
                           Font-Name="Verdana"
                           Font-Size="10pt">
                           <HeaderStyle Font-Bold="true"/>
                           </asp:DataGrid>
                            </body>
Please note: this example assumes you already have your other HTML tags
setup and that the DataGrid is the only control in the BODY, which it doesn't
have to be.
Above, we define a Web server control of type DataGrid, which is a data-driven
control that renders a table on the page. By setting AutoGenerateColumns to true
(which is default anyway), we specify that the DataGrid control will
automatically generate headers and columns based on your data in the order of
the columns in your DataSet. We also setup default paging and a few items
styles, while making the Header column text bold.


In the example Page_Load() event handler, we did a little data binding like so:


                                    myDataGrid.DataSource = ds;
                                     myDataGrid.DataBind();


These two lines associate the DataSource property of the DataGrid with our
DataSet object "ds" and then binds the data with DataBind(). If you do
not call DataBind(), you will find that nothing is rendered on your page. The
DataSource property can point at other types of object, like ArrayList(),
DataView() and many others. Consult your .NET SDK Documentation for more
details.


Strategies for caching your ASP.NET site :
Why would you use this tutorial to build your next data-driven ASP.NET page?
There are several examples, but I will discuss one here. Lets say that you've developed a page or site that generates a table of contents on every page. You also have a SQL Server storing this data because the table of contents changes from time to time. Instead of making calls across the network to the SQL Server (even cached data on SQL Server requires a few calls back and forth), you could use the caching example above.
There are two ways primary ways of handling this:
Setup a scheduled task on the SQL Server 2000 to output your table as XML
to a specified location on your web server. Because SQL Server 2000 can
serialize your data to DiffGrams used in DataSet construction, this is an
easy way to deliver updates to your DiffGram file described above in our
caching example. You could even setup a trigger on your SQL Server to
generate a new DiffGram when the contents of your table change, but that is
beyond the scope of this tutorial.
Another way is to adapt the example above to create not only a DataSet,
but to use classes from System.Data.OleDb or System.Data.SqlClient to get
your data from time to time from the server. In this particular case (which
we'll do below), creating a cache dependency wouldn't make much sense, because the SQL Server is no longer updating your DiffGram file, identified
by the private member _filename in the example above.
You could adapt second method above to something like the following:


                                     <%@ Page Language="C#" %>
                                   <%@ Import Namespace="System.Data.SqlClient" %>
                                    <%@ Import Namespace="System.Data" %>


                                    <script runat="server">
                              // If used frequently, store these strings in your Web.config
                     // and use ConfigurationSettings.AppSettings["key"] to get them out.
                    // If you do this, make sure these are constant strings!
           private const string connstr = "Data Source=sqlserver1;Initial Catalog=Web";
             private const string cmdstr = "SELECT Title,URL FROM TOC";


                          private void Page_Load(Object src, EventArgs args) {
                   DataSet ds = (DataSet)Cache["mydata"];
                    if (ds == null) {
                        // Connect to the SQL Server and get our data using a DataAdapter
                   SqlConnection conn = new SQlConnection(connstr);
                           SqlCommand cmd = new SqlCommand(cmdstr, conn);
                       SqlDataAdapter adapter = new SqlDataAdapter(cmd);


                       // Create a new DataTable and fill it
                          DataTable dt = new DataTable("Item");
                                adapter.Fill(dt);


                       // Now add our DataTable to a DataSet instance and add to cache
                                 ds = new DataSet("TOC");
                                 ds.Tables.Add(dt);
Cache.Insert("mydata", ds, null, DataTime.Now.AddHours(1), NoSlidingExpiration);
                                 }


                                    // Bind our data
                                 myRepeater.DataSource = ds;
                                    myRepeater.DataBind();
                                  }


Yes, I've chanced our ASP.NET control to a Repeater because a DataGrid
wouldn't make a lot of sense. I will describe what you could use in this example
for a Repeater control in a minute.
Describing the example above, it is really nothing more than what we had before
execpt that we have no CacheDependency because we have no files to watch, and we
create our DataSet from a DataTable that is filled by a SqlDataAdapter (or
OleDbDataAdapter if you prefer). DataSets are good to store in the Cache since
they are easy to use, can be used in any data-driven control, and can be
serialized at will with one call to ReadXml() or WriteXml().
Note: another thing to mention to those that have used System.Data.OleDb
classes but not System.Data.SqlClient classes, you will notice I didn't specify
a Provider in the connection string. This is because the SqlClient classes are
only interested in SQL Server connections and, hence, already know what the
Provider is. Finally, our Repeater control would look something like the following:


                   <body>
                   <asp:Repeater id="myRepeater" runat="server" Visible="true">
                   <ItemTemplate>
                   <dd><a href="<%# DataBinder.Eval(Container, "DataItem.URL") %>">
                   <%# DataBinder.Eval(Container, "DataItem.Title") %></a></dd>
                    </ItemTemplate>
                    </asp:Repeater>
                    </body>


The expressions above evaluate your Container (your DataSet object) and find
the "DataItem.Title" and "DataItem.URL". "Item" is
the name of the data item, which is the the name of the table usually. You may
remember that we called our DataTable "Item" above:


                              DataTable dt = new DataTable("Item");


"Title" and "URL" are the names of our fields in the table.
See, even your data is appropriately named!


Conclusions :
That pretty much wraps up the tutorial of how to use caching. There are many
other examples and scenarios of how to use Caching and DataSets to cache data,
but this tutorial is long enough I think. Please keep in mind that you can cache
other objects as well, not just DataSets. I find that caching DataSets where you
used infrequently accessed data is especially helpful, however, to decrease
loads on your Web server, SQL Server (or other database server), and network.
I hope you've found this tutorial helpful and that the wheels in your head are
spinning like mad with new ways to use caching to improve your web site's
performance!

Share