Thursday, February 17, 2011

Layer Masks

This tutorial is for people who are just starting out Photoshop or for the people who have been using Photoshop but don’t know how to use Layer Masks.
The basics of Layer masks are incredibly simple but very powerful.
As always we’ll go over a simple tutorial that will quickly teach you how to use Layer Mask Basics. I think that actually doing something is the best way to learn. At least doing some thing is much, much better than just reading about it.
The Final Result of the tutorial is:
Step 1: Find two images that you want to combine. Here are the images I used:

Step 2: Open both the images in Photoshop. Then, choose the Arrow / Move Tool. Click on the glass image and drag it over to the image with the guy fishing. You can resize the glass so that it’s not too big or you can leave it the way it is. Click here for a short flash video of this step if you are having trouble moving the glass image on top of the ocean image.
Step 3: Choose the layer with the glass and then click on the Layer Mask button. It’s the rectangle with the circle in it.

After clicking you’ll see something like this:
There it is! The layer mask. Currently it is set to reveal all of the image, meaning that the mask is off and nothing is hidden (since it is revealing everything!)
Now we actually use the mask. First let’s think of what we’re trying to do.
We want just the glass visible so we need to get rid of the background of the glass image.
We also don’t want all of the stem of the glass visible because we want to give the illusion that the glass is sitting behind the rocks.


We also want part of the top of the glass transparent because we want the viewer to see through it.
If we used just layers and opacity of layers to accomplish this then we’d end up cutting up glass in lots of portions and messing with the opacity and it would be tedious and really, really annoying and would take a long time. That is why we’ll use the layer mask!
Hmm, you’ll also notice that when you click on the layer mask your colors in the color picker turn to black and white. So here it is… the secret of Layer masks: Depending on what the settings are, the color WHITE shows or reveals the image AND the color BLACK hides or masks the image (We’re talking about the image on which the layer mask is applied, not the layer below it). So on to step 4…

Step 4: Grab your PAINTBRUSH. Choose BLACK and start wildly painting. Paint over the stem so it looks like the rocks are infront. Paint over the background of the glass image. Keep on painting until you only have the glass. Now what if you make a mistake and hide part of the glass? No problem. Layer masks are not destructive so just change the color to WHITE and paint over the glass and it’ll magically reappear. You can basically adjust the brush size, or the shade of gray and you get way more control than using destructive methods. If you use an eraser you can’t easily undo something you did 20 steps before etc etc.

So here is my version of this step:
I’m not worried about being perfect because nothing is being deleted. It’s all there. Just hit the “X” key on your keyboard and you’ll quickly switch between black and white and you can fix your mistakes. Now after you have quickly erased everything that is not needed just zoom waaay in and with a small brush just fix up the edges so they look good. Be sure to get that area in between that lemon slice .

So now I have something...........
Step 5: Finally, we need to make the glass a bit transparent. You can do two things. You can a) Set the opacity of the brush to 50% and then paint right over the glass or b) You can change the color of your brush to gray and then paint over the areas you want to make transparent. Using the current settings (i.e White reveals) then if you make your brush dark gray then your glass will be less opaque and more transparent. If you choose light gray then your glass will appear less transparent. Just
paint it gray in the areas where you want it to appear slightly transparent but not in the areas with the lemon slice and straws. If you can’t make the transparent area look smooth (ie. you can see the brush strokes) then just grab the smudge tool and lightly smudge the gray area until it looks good and smooth. You can use any filter or tool on the layer mask and it’ll give you a new sort of effect .

That is all. You have the final image:
I hope I was able to show you how layer masks can make your life easier. This is obviously not the only thing you can do with layer masks so keep playing with this and learn more. If you have any questions then leave me comments below and I’ll try my best to get back to you in a timely fashion.

Notes:
Layer Masks are one of the easiest features of Photoshop to understand. A Layer mask is just what it sounds like: a mask that goes on a layer. Think of what happens when a person wears a mask. You can see through the holes but not through the mask itself. It’s a great way to non-destructively hide parts of a layer. You will not lose any data and to go back to the original state you’ll just delete the mask.
You can go to Layer > Layer Masks > Reveal All or Hide All to apply the mask (also you can just choose the rectangle with the circle from the Layers window.)
Use the “X” key to quickly switch between Black and White (to show and hide)
Shades of Gray in a layer mask change the opacity of the layer.
A link icon appears in the middle of the layer and the layer mask. If it is linked then both the mask and layer can be moved together. If it is unlinked then you can independently move the layer and its mask.
Be sure to click the Layer mask rectangle in the layer window when working with layer masks. Commonly, layer masks are used with Text and Gradients so experiment with those.

Wednesday, February 16, 2011

JavaScript Date and Time Functions Examples

JavaScript provides the following date and time functions. Note that UTC stands for Universal Coordinated Time which refers to the time as set by the World Time Standard. Previously referred to as Greenwich Mean Time or GMT.
Displaying the Current Date :
1:Typing this code...


var currentDate = new Date()
  var day = currentDate.getDate()
  var month = currentDate.getMonth()
  var year = currentDate.getFullYear()
  document.write("<b>" + day + "/" + month + "/" + year + "</b>")
Results in this...
16/2/2011


Displaying the Current Time :
2:Typing this code...

var currentTime = new Date()
  var hours = currentTime.getHours()
  var minutes = currentTime.getMinutes()
  if (minutes < 10)
  minutes = "0" + minutes
  document.write("<b>" + hours + ":" + minutes + " " + "</b>")
Results in this...
16:55
You may have noticed that we had to add a leading zero to the minutes part of the date if it was less than 10. By default, JavaScript doesn't display the leading zero. Also, you might have noticed that the time is being displayed in 24 hour time format. This is how JavaScript displays the time. If you need to display it in AM/PM format, you need to convert it.

Tuesday, February 15, 2011

Really Useful & Handy PHP Code_21

PHP is the most widely used web based programming language that powers millions of websites including some of the most popular ones like Facebook. Here are 21 really useful and handy PHP code snippets that every type of PHP developer will find useful.

1. Human Random Readable String :
This code will create a human readable string that will look more close to dictionary words, useful for captchas.

/************** 
*@length - length of random string (must be a multiple of 2) 
**************/  
function readable_random_string($length = 6){  
    $conso=array("b","c","d","f","g","h","j","k","l",  
    "m","n","p","r","s","t","v","w","x","y","z");  
    $vocal=array("a","e","i","o","u");  
    $password="";  
    srand ((double)microtime()*1000000);  
    $max = $length/2;  
    for($i=1; $i<=$max; $i++)  
    {  
    $password.=$conso[rand(0,19)];  
    $password.=$vocal[rand(0,4)];  
    }  
    return $password;  
}  


2. Generate a Random String :
If you don’t need human readable string, then use this function instead, which will create a random string you can use for user id’s etc.
/************* 
*@l - length of random string 
*/  
function generate_rand($l){  
  $c= "ABCDEFGHIJKLMNOPQRSTUVWXYZabcdefghijklmnopqrstuvwxyz0123456789";  
  srand((double)microtime()*1000000);  
  for($i=0; $i<$l; $i++) {  
      $rand.= $c[rand()%strlen($c)];  
  }  
  return $rand;  
 }  


3. Encode Email Address :
With this snippet, you can encode any email address into HTML entities so that spam bots do not find it.

function encode_email($email='info@domain.com', $linkText='Contact Us', $attrs ='class="emailencoder"' )  
{  
    // remplazar aroba y puntos  
    $email = str_replace('@', '&#64;', $email);  
    $email = str_replace('.', '&#46;', $email);  
    $email = str_split($email, 5);  
  
    $linkText = str_replace('@', '&#64;', $linkText);  
    $linkText = str_replace('.', '&#46;', $linkText);  
    $linkText = str_split($linkText, 5);  
  
    $part1 = '<a href="ma';  
    $part2 = 'ilto&#58;';  
    $part3 = '" '. $attrs .' >';  
    $part4 = '</a>';  
  
    $encoded = '<script type="text/javascript">';  
    $encoded .= "document.write('$part1');";  
    $encoded .= "document.write('$part2');";  
    foreach($email as $e)  
    {  
            $encoded .= "document.write('$e');";  
    }  
    $encoded .= "document.write('$part3');";  
    foreach($linkText as $l)  
    {  
            $encoded .= "document.write('$l');";  
    }  
    $encoded .= "document.write('$part4');";  
    $encoded .= '</script>';  
  
    return $encoded;  


4. Validate email Address :
E-mail validation is perhaps the most used validation in web forms, this code will validate email address and also optionally check the MX records of the domain provided in email address to make email validation more robust.

function is_valid_email($email, $test_mx = false)  
{  
    if(eregi("^([_a-z0-9-]+)(\.[_a-z0-9-]+)*@([a-z0-9-]+)(\.[a-z0-9-]+)*(\.[a-z]{2,4})$", $email))  
        if($test_mx)  
        {  
            list($username, $domain) = split("@", $email);  
            return getmxrr($domain, $mxrecords);  
        }  
        else  
            return true;  
    else  
        return false;  
}
  
5. List Directory Contents :

function list_files($dir)  
{  
    if(is_dir($dir))  
    {  
        if($handle = opendir($dir))  
        {  
            while(($file = readdir($handle)) !== false)  
            {  
                if($file != "." && $file != ".." && $file != "Thumbs.db")  
                {  
                    echo '<a target="_blank" href="'.$dir.$file.'">'.$file.'</a><br>'."\n";  
                }  
            }  
            closedir($handle);  
        }  
    }  
}
  

6. Destroy Directory
Delete a directory including its contents.

/***** 
*@dir - Directory to destroy 
*@virtual[optional]- whether a virtual directory 
*/  
function destroyDir($dir, $virtual = false)  
{  
    $ds = DIRECTORY_SEPARATOR;  
    $dir = $virtual ? realpath($dir) : $dir;  
    $dir = substr($dir, -1) == $ds ? substr($dir, 0, -1) : $dir;  
    if (is_dir($dir) && $handle = opendir($dir))  
    {  
        while ($file = readdir($handle))  
        {  
            if ($file == '.' || $file == '..')  
            {  
                continue;  
            }  
            elseif (is_dir($dir.$ds.$file))  
            {  
                destroyDir($dir.$ds.$file);  
            }  
            else  
            {  
                unlink($dir.$ds.$file);  
            }  
        }  
        closedir($handle);  
        rmdir($dir);  
        return true;  
    }  
    else  
    {  
        return false;  
    }  
}  


7. Parse JSON Data :
With most of the popular web services like Twitter providing their data through APIs, it is always helpful to know how to parse API data which is sent in various formats including JSON, XML etc.

$json_string='{"id":1,"name":"foo","email":"foo@foobar.com","interest":["wordpress","php"]} ';  
$obj=json_decode($json_string);  
echo $obj->name; //prints foo  
echo $obj->interest[1]; //prints php 


8. Parse XML Data :

//xml string  
$xml_string="<?xml version='1.0'?> 
<users> 
   <user id='398'> 
      <name>Foo</name> 
      <email>foo@bar.com</name> 
   </user> 
   <user id='867'> 
      <name>Foobar</name> 
      <email>foobar@foo.com</name> 
   </user> 
</users>";  
  
//load the xml string using simplexml  
$xml = simplexml_load_string($xml_string);  
  
//loop through the each node of user  
foreach ($xml->user as $user)  
{  
   //access attribute  
   echo $user['id'], '  ';  
   //subnodes are accessed by -> operator  
   echo $user->name, '  ';  
   echo $user->email, '<br />';  
} 


9. Create Post Slugs :
Create user friendly post slugs from title string to use within URLs.

function create_slug($string){  
    $slug=preg_replace('/[^A-Za-z0-9-]+/', '-', $string);  
    return $slug;  


10. Get Real IP Address of Client :
This function will fetch the real IP address of the user even if he is behind a proxy server.

function getRealIpAddr()  
{  
    if (!emptyempty($_SERVER['HTTP_CLIENT_IP']))  
    {  
        $ip=$_SERVER['HTTP_CLIENT_IP'];  
    }  
    elseif (!emptyempty($_SERVER['HTTP_X_FORWARDED_FOR']))  
    //to check ip is pass from proxy  
    {  
        $ip=$_SERVER['HTTP_X_FORWARDED_FOR'];  
    }  
    else  
    {  
        $ip=$_SERVER['REMOTE_ADDR'];  
    }  
    return $ip;  
}


11. Force file Download :
Provide files to the user by forcing them to download. 

/******************** 
*@file - path to file 
*/  
function force_download($file)  
{  
    if ((isset($file))&&(file_exists($file))) {  
       header("Content-length: ".filesize($file));  
       header('Content-Type: application/octet-stream');  
       header('Content-Disposition: attachment; filename="' . $file . '"');  
       readfile("$file");  
    } else {  
       echo "No file selected";  
    }  


12. Creating a Tag Cloud :
function getCloud( $data = array(), $minFontSize = 12, $maxFontSize = 30 )  
{  
    $minimumCount = min($data);  
    $maximumCount = max($data);  
    $spread       = $maximumCount - $minimumCount;  
    $cloudHTML    = '';  
    $cloudTags    = array();  
  
    $spread == 0 && $spread = 1;  
  
    foreach( $data as $tag => $count )  
    {  
        $size = $minFontSize + ( $count - $minimumCount )  
            * ( $maxFontSize - $minFontSize ) / $spread;  
        $cloudTags[] = '<a style="font-size: ' . floor( $size ) . 'px'  
        . '" class="tag_cloud" href="#" title="\'' . $tag  .  
        '\' returned a count of ' . $count . '">'  
        . htmlspecialchars( stripslashes( $tag ) ) . '</a>';  
    }  
  
    return join( "\n", $cloudTags ) . "\n";  
}  
/************************** 
****   Sample usage    ***/  
$arr = Array('Actionscript' => 35, 'Adobe' => 22, 'Array' => 44, 'Background' => 43,  
    'Blur' => 18, 'Canvas' => 33, 'Class' => 15, 'Color Palette' => 11, 'Crop' => 42,  
    'Delimiter' => 13, 'Depth' => 34, 'Design' => 8, 'Encode' => 12, 'Encryption' => 30,  
    'Extract' => 28, 'Filters' => 42);  
echo getCloud($arr, 12, 36);  

13. Find Similarity Between Two Strings :
PHP includes a function similar_text very rarely used but quite useful that compares two strings and returns the percentage of similarity between two.
similar_text($string1, $string2, $percent);  
//$percent will have the percentage of similarity  

14. Use Gravatars in Your Application :
With ever increasing popularity of WordPress, Gravatars have become quite popular. It is very easy to integrate them into your application as they provide a very easy to use API.
/****************** 
*@email - Email address to show gravatar for 
*@size - size of gravatar 
*@default - URL of default gravatar to use 
*@rating - rating of Gravatar(G, PG, R, X) 
*/  
function show_gravatar($email, $size, $default, $rating)  
{  
    echo '<img src="http://www.gravatar.com/avatar.php?gravatar_id='.md5($email).  
        '&default='.$default.'&size='.$size.'&rating='.$rating.'" width="'.$size.'px" 
        height="'.$size.'px" />';  
}

15. Truncate Text at Word Break :
This function will truncate strings only at word breaks which can be used to show a teaser for complete article without breaking words.
// Original PHP code by Chirp Internet: www.chirp.com.au  
// Please acknowledge use of this code by including this header.  
function myTruncate($string, $limit, $break=".", $pad="...") {  
    // return with no change if string is shorter than $limit  
    if(strlen($string) <= $limit)  
        return $string;   
  
    // is $break present between $limit and the end of the string?  
    if(false !== ($breakpoint = strpos($string, $break, $limit))) {  
        if($breakpoint < strlen($string) - 1) {  
            $string = substr($string, 0, $breakpoint) . $pad;  
        }  
    }  
    return $string;  
}  
/***** Example ****/  
$short_string=myTruncate($long_string, 100, ' ');  


16. Zip Files on the Fly :
/* creates a compressed zip file */  
function create_zip($files = array(),$destination = '',$overwrite = false) {  
    //if the zip file already exists and overwrite is false, return false  
    if(file_exists($destination) && !$overwrite) { return false; }  
    //vars  
    $valid_files = array();  
    //if files were passed in...  
    if(is_array($files)) {  
        //cycle through each file  
        foreach($files as $file) {  
            //make sure the file exists  
            if(file_exists($file)) {  
                $valid_files[] = $file;  
            }  
        }  
    }  
    //if we have good files...  
    if(count($valid_files)) {  
        //create the archive  
        $zip = new ZipArchive();  
        if($zip->open($destination,$overwrite ? ZIPARCHIVE::OVERWRITE : ZIPARCHIVE::CREATE) !== true) {  
            return false;  
        }  
        //add the files  
        foreach($valid_files as $file) {  
            $zip->addFile($file,$file);  
        }  
        //debug  
        //echo 'The zip archive contains ',$zip->numFiles,' files with a status of ',$zip->status;  
  
        //close the zip -- done!  
        $zip->close();  
  
        //check to make sure the file exists  
        return file_exists($destination);  
    }  
    else  
    {  
        return false;  
    }  
}  
/***** Example Usage ***/  
$files=array('file1.jpg', 'file2.jpg', 'file3.gif');  
create_zip($files, 'myzipfile.zip', true);  
Source: David Walsh

17. Unzip Zip File :
/********************** 
*@file - path to zip file 
*@destination - destination directory for unzipped files 
*/  
function unzip_file($file, $destination){  
    // create object  
    $zip = new ZipArchive() ;  
    // open archive  
    if ($zip->open($file) !== TRUE) {  
        die (’Could not open archive’);  
    }  
    // extract contents to destination directory  
    $zip->extractTo($destination);  
    // close archive  
    $zip->close();  
    echo 'Archive extracted to directory';  
}  
18. Prepend http to a URL :
Some times you need to accept some url as input but users seldom add http:// to it, this code will add http:// to the URL if it’s not there.
if (!preg_match("/^(http|ftp):/", $_POST['url'])) {  
   $_POST['url'] = 'http://'.$_POST['url'];  
}
  
19. Convert URLs within String into hyperlinks :
This function converts URLs and e-mail addresses within a string into clickable hyperlinks.
function makeClickableLinks($text) {  
 $text = eregi_replace('(((f|ht){1}tp://)[-a-zA-Z0-9@:%_+.~#?&//=]+)',  
 '<a href="\1">\1</a>', $text);  
 $text = eregi_replace('([[:space:]()[{}])(www.[-a-zA-Z0-9@:%_+.~#?&//=]+)',  
 '\1<a href="http://\2">\2</a>', $text);  
 $text = eregi_replace('([_.0-9a-z-]+@([0-9a-z][0-9a-z-]+.)+[a-z]{2,3})',  
 '<a href="mailto:\1">\1</a>', $text);  
  
return $text;  


20. Resize Images on the fly :
Creating thumbnails of the images is required many a times, this code will be useful to know about the logic of thumbnail generation.
/********************** 
*@filename - path to the image 
*@tmpname - temporary path to thumbnail 
*@xmax - max width 
*@ymax - max height 
*/  
function resize_image($filename, $tmpname, $xmax, $ymax)  
{  
    $ext = explode(".", $filename);  
    $ext = $ext[count($ext)-1];  
  
    if($ext == "jpg" || $ext == "jpeg")  
        $im = imagecreatefromjpeg($tmpname);  
    elseif($ext == "png")  
        $im = imagecreatefrompng($tmpname);  
    elseif($ext == "gif")  
        $im = imagecreatefromgif($tmpname);  
  
    $x = imagesx($im);  
    $y = imagesy($im);  
  
    if($x <= $xmax && $y <= $ymax)  
        return $im;  
  
    if($x >= $y) {  
        $newx = $xmax;  
        $newy = $newx * $y / $x;  
    }  
    else {  
        $newy = $ymax;  
        $newx = $x / $y * $newy;  
    }  
  
    $im2 = imagecreatetruecolor($newx, $newy);  
    imagecopyresized($im2, $im, 0, 0, 0, 0, floor($newx), floor($newy), $x, $y);  
    return $im2;  
}

21. Detect AJAX Request :
Most of the JavaScript frameworks like jQuery, mootools send and additional HTTP_X_REQUESTED_WITH header when they make an AJAX request, so that you can detect AJAX request on server side.(source)
if(!emptyempty($_SERVER['HTTP_X_REQUESTED_WITH']) && strtolower($_SERVER['HTTP_X_REQUESTED_WITH']) == 'xmlhttprequest'){
    //If AJAX Request Then  
}else{  
//something else  
}  
This 21 really useful and handy PHP code snippets that every type of PHP developer will find useful.

Monday, February 14, 2011

What Is File Transfer Protocol -(FTP) ?

The File Transfer Protocol is an excellent method to transfer (download and send) files from one computer to the other over the Internet. Though you can transfer files using email, it is not a good choice especially when the file size is large or when you need to transfer several files. The objectives of FTP are to:
  • promote file (programs or data) sharing
  • efficiently transfer data from one computer to another
  • encourage indirect or implicit use of remote computers
  • provide a common platform for file storages among different hosts
FTP sites :
FTP sites are storehouses of hundreds to thousands of files - programs, data, music, video etc. In order to upload or download a file from an FTP site, you need to know the login details - the FTP username and FTP password. Once connected, you can transfer files using the binary or ASCII mode. The binary mode is used for binary files like executable programs, music, images, video etc. while the ASCII mode is employed for plain text files such as those created in Notepad, vi etc.
What is anonymous FTP ?
Some universities, government agencies, companies, and private individuals have set up public archives that you may access via FTP, usually in a directory named pub. These sites contain programs, data files, and informational text. You can often find specific directions or information about the site in greeting messages or files with names like README.
You can use an FTP client such as WinSCP for Windows or Cyberduck for Macintosh to connect to an anonymous FTP site, or you can use FTP from the command line in Windows, Mac OS X, or Unix. For more information, including specific commands and more detailed instructions, see What is FTP, and how do I use it to transfer files? Typically you will need to use the username anonymous and an arbitrary password. Most sites will ask you to enter your email address as the password. If your login is successful, you can browse the public directories on the site.
You can also access anonymous FTP sites in your web browser. For example, to connect to the Usenet FAQs maintained at MIT, visit:
  ftp://rtfm.mit.edu/pub/faqs/
Anonymous FTP is a privilege granted by the organization that owns the computer to which you are connecting; be considerate in your usage. Don't transfer files you don't need or an excessive amount of material, and try to restrict your transfers to off-peak hours. Some FTP sites are used very heavily, and you may need patience to connect.
FTP and web sites
The File Transfer Protocol is generally used by web developers to upload web sites to the host - the computer that stores the web site. For example, if you buy a web hosting package, the company would provide you with a username and password with which you'll connect to the FTP server to transfer your files.

FTP is built into the Unix system and can be accessed by typing ftp at the Unix prompt.
FTP is also available in Windows. You need to open an MS-DOS window and type ftp at the Dos prompt. The prompt will change to an FTP prompt. You can open an FTP site with the 'open' command. Type 'quit' to come back to the Dos prompt. To get help, type 'help' or '?' at the FTP prompt. This will list the commands available on your system - check the image below.
To get help on a specific command, type help [Command name] or ? [Command name]. So if you need help with the verbose command, type help verbose or ? verbose.
File Transfer Protocol and the browser
Modern browsers allow you to access sites using FTP. For example, if I need to connect to this web site from Internet Explorer (version 6) on the Windows XP system, I can simply type in ftp://www.webdevelopersnotes.com in the address bar. A login window then pops up (see below), in which I need to type in the username and password to connect to the host. I can then transfer files using the familiar drag-drop method. So one can actually work in the user-friendly environment of the operating system without knowing all the arcane FTP commands! Now isn't that cool?
FTP clients
If you plan to FTP on a regular basis, I suggest you use an FTP Client - a dedicated program for FTP. There are many FTP clients available (and some of them are freeware). The interface of each program varies, but the information required is almost the same. You should know your username and password of the site (if it is not anonymous FTP) and the server address.

How do I upload my files on my web host?

There are two ways to upload your web site files to hosting server - using a File Manager (or similar) utility provided by the web hosting company or File Transfer Protocol (FTP). The first method is easier but time-consuming while the second is a faster method but needs a little technical knowledge.
    Using the File Manager to upload files to a web hosting server
This method is applicable only if a File Manager (or similar) utility has been provided by your hosting company. The utility is generally located under the Control Panel of your account and so you need to login first. For instance, at my hosting accounts, the File Manager is displayed as an icon along with other utilities in the control panel. The File Manager icon looks like one below.

This method is applicable only if a File Manager (or similar) utility has been provided by your hosting company. The utility is generally located under the Control Panel of your account and so you need to login first. For instance, at my hosting accounts, the File Manager is displayed as an icon along with other utilities in the control panel. The File Manager icon looks like one below.
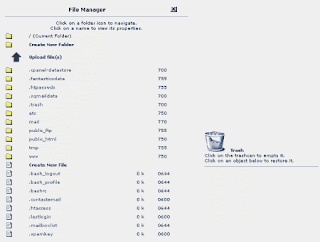
To use the File Manager, click on its icon. A new window opens and displays the directories at your web hosting account. [Refer image below]

You need to upload all website files to the document root directory which is www or public_html in the image above. Thus, all your website files need to reside in the document root directory.
If you click on the directory name, you get a set of links displayed on the top-right that let you delete, rename, change permission etc. for this directory. [Refer image below]

To view the contents of a directory, you would need to click on the small folder image located in front of the directory name. If I click on the document root directory on my web host, it displays its contents as in the image below.
IMPORTANT: To transfer files to a particular directory, you need to first migrate to it.
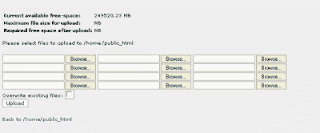
To upload files, click on the Upload Files link (refer the above image). This should open a form through which you can select files from your system and upload them on your web hosting server.

Share