If you would like to follow along using our night sky background you can download it by right -clicking on the image and saving it to your hard-drive.
 Step 1: Start Flash and Create a New Flash Document :
Start Flash and create a new document (File > New and choose Flash Document or Ctrl (win) / Cmd(mac) + N and choose Flash Document) and to make it easier to follow along reset Flash's workspace to default. Choose Window > Workspace Layout > Default.
Step 2: Set the Document Properties :
 Double-click the Frame Rate label at the bottom of the Timeline to display the Document Properties dialog box.
 If you are using the Night Sky Jpeg, change the dimensions to 480 width and 320 height otherwise size the document to match the graphic you are using as a background. We don't need to specify the background color as we are going to completely cover the background layer with the night sky jpeg. Leave everything else at their default values and Click OK .
Step 3: Import the Night Sky JPEG :
Import the night sky jpeg to the stage by choosing File > Import > Import to Stage.
Step 4: Position the Night Sky JPEG :
 Now that we have our Night Sky JPEG imported into our new document we need to accurately position it on the stage so that it doesn't leave any hairline cracks around the edges. The easiest way to accomplish this is to use the Align Palette.
Open the Align Palette by choosing Window > Align or Ctrl (win) / Cmd (mac) + K
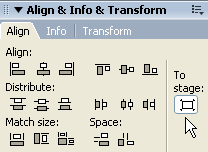 With the Align Palette you can choose to Align various objects relative to each other or you can Align objects to the Stage itself by clicking the Align to Stage button. Select the Night Sky JPEG and with the Align to Stage button on click on the Align Horizontal Center button and then the Align Vertical Center buttons to move the Night Sky JPEG into position.
Step 5: Lock Layer 1:
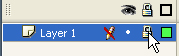
Now that we have accurately aligned our background graphic we want to prevent the possibility of accidently moving it. On the Layers Palette click in lock column within layer 1 to prevent further editing of this layer.
Step 6: Create a New Layer :
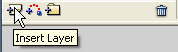 Click on the Insert Layer icon at the bottom of the Layers Palette to create a new layer.
 Select the Polystar tool from the tool box (if it is hidden click on the Rectangle Tool and hold down the mouse till the Polystar tool displays). With the Polystar tool selected you can then set the properties of the tool in the Properties Inspector at the bottom of the screen.
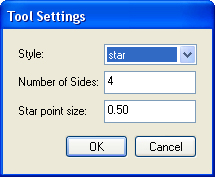 Set the fill to white and the stroke to none. Then click on the Options button on the Properties inspector to open the Tool Options dialog box. This is where we will choose the Star shape, 4 points and a point size of 0.50. Then click OK.
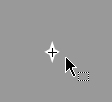
 Now that the tool is set draw out a small star shape. If you are happy with this shape you can leave like it is. To me stars always seemed a bit more diamond shaped so I am going to push in the horizontal arms using the selection tool.
 When altering small objects it is best to get a close up view. Use the zoom tool and draw a marquee around the star to get a better view of the object you are working on. Then choose the Selection tool but do not select the star object. Just nudge one of the horizontal arms towards the center.
Step 8 Convert to Symbol :
Now that we have the star in the shape we want we want, we need to convert it to a symbol. Select the shape and choose Modify > Convert to Symbol or F8. Choose Graphic for the type of symbol and make sure the registration is set to center. Then click OK.

Step 9: Creating the Twinkling Star symbol :
We are now going to create another symbol that will actually contain instances of the first symbol. Start by choosing Insert > New Symbol. Name this symbol twinkleStar and choose Graphic for the Type, then click OK.
This will take you into symbol editing mode. The problem is that we are going to be working with a white star on a white background. To make it easier to see double click the Frame Rate label in the timeline (see step 2) and change the background color to something other than white. We need to access our already created starShape symbol so if the Library isn't already displaying along the right side of the screen choose Window > Library to open it.
Your library should look much the same as the picture at the right.
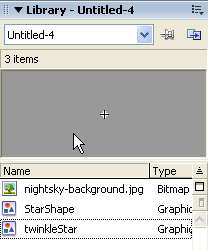 Drag one of your StarShape symbols from the Library onto the Stage. Use the Align palette and center the star symbol on the stage by clicking on the Align to Stage button and choosing Align Horizontal Center and Align Vertical Center.
This forms the first frame of our twinkling Animation.
We are going to create the other stages of our twinklingStar symbol by right-clicking(win) or Cmd-clicking (mac) on the single keyframe in the timeline and choosing Copy Frames from the resulting context sensitive menu. Then right-click in the empty 10th frame and choose Paste Frames. Repeat for the 20th Frame.
We now have three key frames in our symbol but... they are all the same. In order to create the twinkling effect we are going to set the opacity of the symbol instance in the first and 20th frames to 0.
First, select Frame 1 in the timeline. Then select the starShape Symbol on the stage and choose Alpha from the Color drop down box on the Properties Inspector. Set the Alpha to 0. Repeat this with the Star Symbol on the 20th frame.
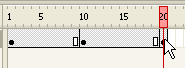
At this point your symbol's timeline contains three keyframes. We now need to add a couple of motion tweens to blend the changes between the 1st, 10th and 20th frames. Insert a motion tween by right-clicking(win) or Cmd-clicking (mac)on the grey bar between the 1st and 10th frame and choose Create Motion Tween from the resulting context menu. Create a second motion tween between the 10th and 20th frames.
The twinkling Star symbol is done - now we just have to add a bunch of instances to the background to create our own starry night.
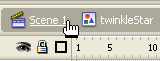
To return to the main Timeline click on the Scene 1 link at the top of the Timeline.
Step 10: Adding Frames to the Main Timeline:
Because graphic symbols animate within the timeline of the movie they are inserted into we need to add some more frames to our movie or the stars animation won't display. If they were movie symbols having only 1 frame in the main timeline wouldn't matter however, we wouldn't be able to set the symbols to start on different frames.
On the main 40th frame in the main Timeline, right click (win) or Ctrl-click (mac) and choose Insert Frame. You will need to add frames to layer 1 as well or your background will disapear after the first frame.
Step 11: Adding twinklingStar Symbol Instances to our Movie :
Now all we need to do is add a whole bunch of twinklingStar Symbols to our movie. But... in order for this too look somewhat realistic we need to vary the stars sizes and when they pulse. The ability to change which frame the symbol animation starts on is the big reason we chose to use graphic symbols instead of movie symbols.
 Click and drag a twinklingStar symbol from the Library onto the Stage. With the symbol selected set the following properties in the Properties Inspector. Width & Height, keep the lock symbol between the sizes to keep the object proportional. For my flash movie I chose to make all the stars between 2 and 6 wide. I know this sounds small but if the stars are too large they look fake. Then make sure Loop is chosen and give the star symbols you add a variety of first frames. Remember you have 20 frames to choose from. If you leave them all set to 1 they will all pulse at exactly the same time so give them some variety.
Now repeat for as many stars as you want to add. I find it more realistic if you group clumps of stars together with a few random one scattered about.
Step 12: Save and test your movie :
Choose File > Save as to save your movie to your hard-drive. Then choose Control > Test Movie to see how your twinkling star animation looks.

Start Flash and create a new document (File > New and choose Flash Document or Ctrl (win) / Cmd(mac) + N and choose Flash Document) and to make it easier to follow along reset Flash's workspace to default. Choose Window > Workspace Layout > Default.
Step 2: Set the Document Properties :

Step 3: Import the Night Sky JPEG :
Import the night sky jpeg to the stage by choosing File > Import > Import to Stage.
Step 4: Position the Night Sky JPEG :
Now that we have our Night Sky JPEG imported into our new document we need to accurately position it on the stage so that it doesn't leave any hairline cracks around the edges. The easiest way to accomplish this is to use the Align Palette.Open the Align Palette by choosing Window > Align or Ctrl (win) / Cmd (mac) + K
With the Align Palette you can choose to Align various objects relative to each other or you can Align objects to the Stage itself by clicking the Align to Stage button. Select the Night Sky JPEG and with the Align to Stage button on click on the Align Horizontal Center button and then the Align Vertical Center buttons to move the Night Sky JPEG into position. Step 5: Lock Layer 1:
Now that we have accurately aligned our background graphic we want to prevent the possibility of accidently moving it. On the Layers Palette click in lock column within layer 1 to prevent further editing of this layer.
Step 6: Create a New Layer :
Click on the Insert Layer icon at the bottom of the Layers Palette to create a new layer.Select the Polystar tool from the tool box (if it is hidden click on the Rectangle Tool and hold down the mouse till the Polystar tool displays). With the Polystar tool selected you can then set the properties of the tool in the Properties Inspector at the bottom of the screen.Set the fill to white and the stroke to none. Then click on the Options button on the Properties inspector to open the Tool Options dialog box. This is where we will choose the Star shape, 4 points and a point size of 0.50. Then click OK.Now that the tool is set draw out a small star shape. If you are happy with this shape you can leave like it is. To me stars always seemed a bit more diamond shaped so I am going to push in the horizontal arms using the selection tool.
Step 8 Convert to Symbol :
Now that we have the star in the shape we want we want, we need to convert it to a symbol. Select the shape and choose Modify > Convert to Symbol or F8. Choose Graphic for the type of symbol and make sure the registration is set to center. Then click OK.

We are now going to create another symbol that will actually contain instances of the first symbol. Start by choosing Insert > New Symbol. Name this symbol twinkleStar and choose Graphic for the Type, then click OK.
This will take you into symbol editing mode. The problem is that we are going to be working with a white star on a white background. To make it easier to see double click the Frame Rate label in the timeline (see step 2) and change the background color to something other than white. We need to access our already created starShape symbol so if the Library isn't already displaying along the right side of the screen choose Window > Library to open it.
Your library should look much the same as the picture at the right.
Drag one of your StarShape symbols from the Library onto the Stage. Use the Align palette and center the star symbol on the stage by clicking on the Align to Stage button and choosing Align Horizontal Center and Align Vertical Center.This forms the first frame of our twinkling Animation.
We are going to create the other stages of our twinklingStar symbol by right-clicking(win) or Cmd-clicking (mac) on the single keyframe in the timeline and choosing Copy Frames from the resulting context sensitive menu. Then right-click in the empty 10th frame and choose Paste Frames. Repeat for the 20th Frame.

We now have three key frames in our symbol but... they are all the same. In order to create the twinkling effect we are going to set the opacity of the symbol instance in the first and 20th frames to 0.
First, select Frame 1 in the timeline. Then select the starShape Symbol on the stage and choose Alpha from the Color drop down box on the Properties Inspector. Set the Alpha to 0. Repeat this with the Star Symbol on the 20th frame.
At this point your symbol's timeline contains three keyframes. We now need to add a couple of motion tweens to blend the changes between the 1st, 10th and 20th frames. Insert a motion tween by right-clicking(win) or Cmd-clicking (mac)on the grey bar between the 1st and 10th frame and choose Create Motion Tween from the resulting context menu. Create a second motion tween between the 10th and 20th frames.
The twinkling Star symbol is done - now we just have to add a bunch of instances to the background to create our own starry night.
To return to the main Timeline click on the Scene 1 link at the top of the Timeline.
Step 10: Adding Frames to the Main Timeline:
Because graphic symbols animate within the timeline of the movie they are inserted into we need to add some more frames to our movie or the stars animation won't display. If they were movie symbols having only 1 frame in the main timeline wouldn't matter however, we wouldn't be able to set the symbols to start on different frames.
On the main 40th frame in the main Timeline, right click (win) or Ctrl-click (mac) and choose Insert Frame. You will need to add frames to layer 1 as well or your background will disapear after the first frame.
Step 11: Adding twinklingStar Symbol Instances to our Movie :
Now all we need to do is add a whole bunch of twinklingStar Symbols to our movie. But... in order for this too look somewhat realistic we need to vary the stars sizes and when they pulse. The ability to change which frame the symbol animation starts on is the big reason we chose to use graphic symbols instead of movie symbols.

Now repeat for as many stars as you want to add. I find it more realistic if you group clumps of stars together with a few random one scattered about.
Step 12: Save and test your movie :
Choose File > Save as to save your movie to your hard-drive. Then choose Control > Test Movie to see how your twinkling star animation looks.


2 comments:
I just take a peek and I suddenly discovered this post. I was impressed and amazed. I will refer this to my friend. Thank you.
web design manila
I'm glad i have visited your site, you posted some really nice information.Thanks for the information.Hoping more posts from you.logo design
Post a Comment